New book release “Dynamics AX Project Accounting & Controlling-Part1”
24 Tuesday Jan 2017
Posted Miscellaneous
in24 Tuesday Jan 2017
Posted Miscellaneous
in06 Sunday Mar 2016
Posted Accounts Receivable
inTags
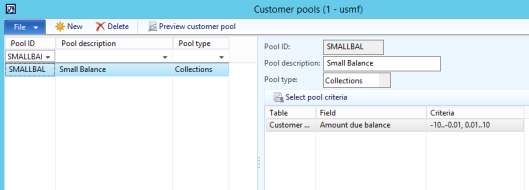
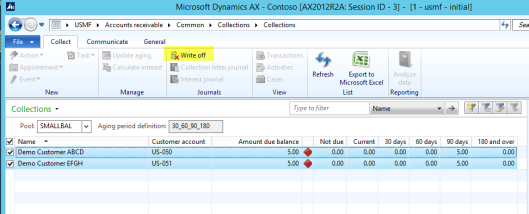
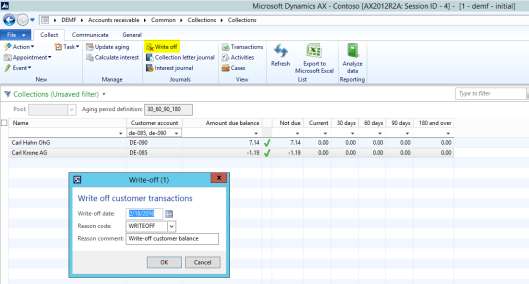
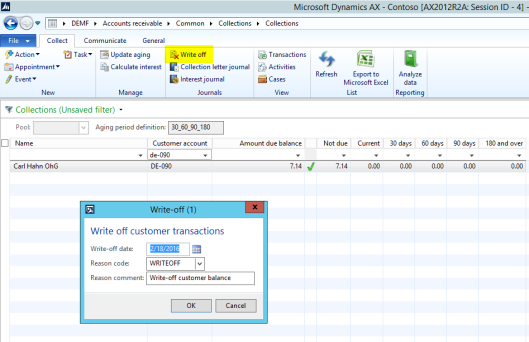
In one of the prior posts I showed you how customer pools can be used for identifying and writing-off small customer balances. (Please see the following two screenshots).
Problem
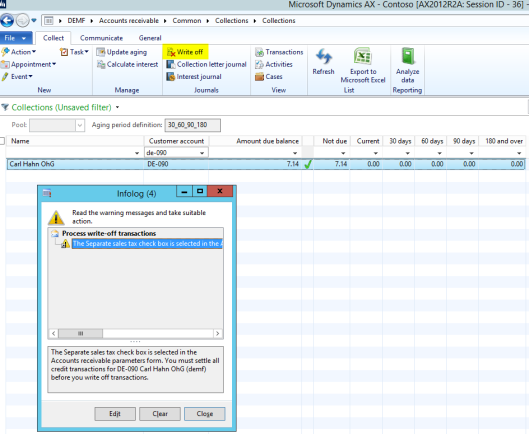
If you are trying to write-off a customer with a negative balance you might receive the following error message that interrupts the write-off process.
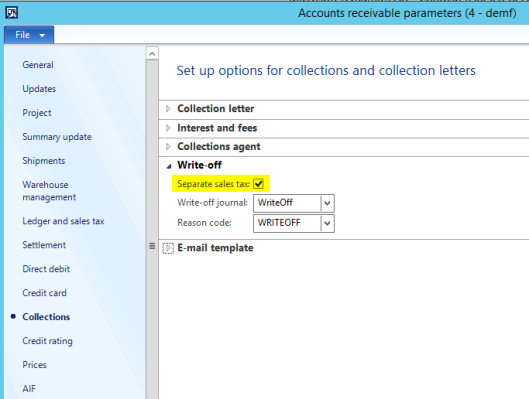
The underlying reason for this error is the following Accounts Receivable parameter which ensures a corresponding tax correction posting for the transactions that are written off.
Note that the error message does not pop up if the “separate sales tax” parameter is not activated. Deactivating this parameter is, however, not an option unless you want to pay more tax than necessary and generate wrong sales tax postings.
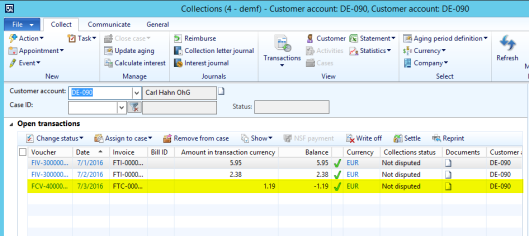
Please note that you might also encounter the error message shown above in situations where everything seems on first sight ok. Example:
In those cases the underlying reason for the error are usually credit transactions that are included in the total (overall positive) customer balance.
Solution 1
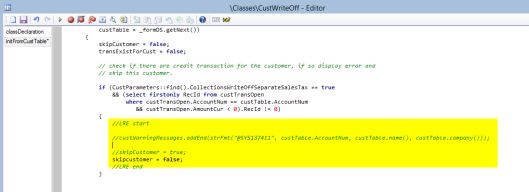
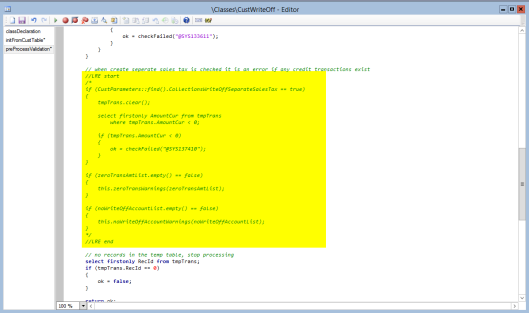
A first option to get the issue fixed is making the following code adjustments in the CustWriteOff class.
Result: Once the code adjustment is implemented, the negative customer balance can be written off.
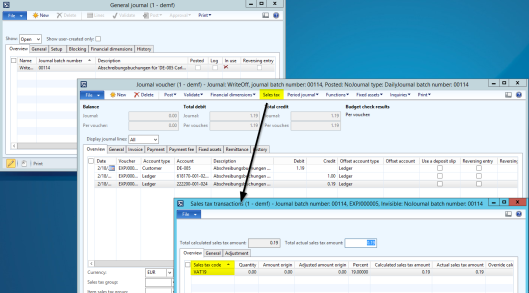
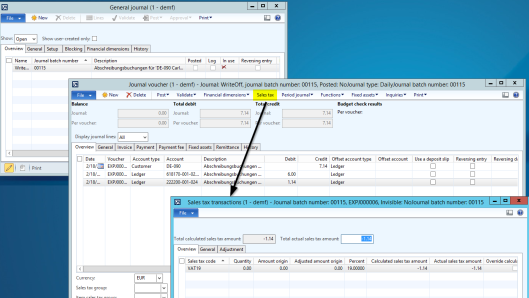
Please note that Dynamics AX generates the write off transactions including the corresponding tax correction as exemplified in the next screen-print.
Also the small customer balance that includes a credit transaction can be written off.
Please note that Dynamics AX summarizes the different transactions included in the total balance and generates the corresponding tax adjustment transactions. If different tax rates have been used for posting the original transactions, several tax adjustment lines will be created.
Solution 2
If your management does not like to implement a code adjustment and/or if you are working with older Dynamics AX versions that do not have the collection functionalities available, you can alternatively follow the next steps to write off small customer transactions.
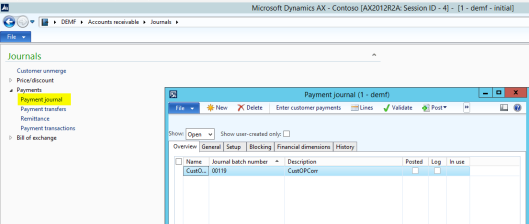
Step 1: Create a new customer payment journal
Step 2: Create a payment proposal
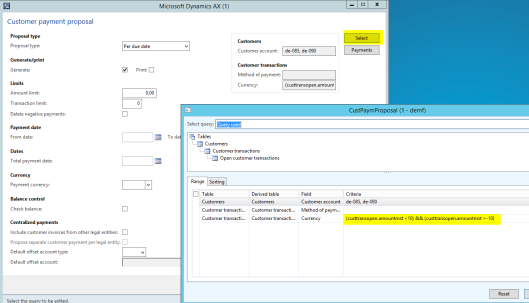
Step 3: Select the transactions that need to be written off
Note: Selecting a range of small transaction amounts requires specifying a SQL statement similar to the one exemplified in the previous screen-print. For additional details, please see e.g. this site.
The second approach illustrated here does not refer to small customer balances but instead to individual customer transactions that fall within the $-amount range specified in the SQL statement.
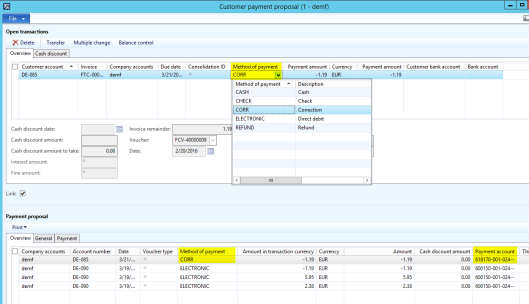
Step 4: Change method of payment
To ensure that the small customer transactions are posted against the correct ledger account, it is wise setting up a new method of payment that is linked to a “depreciation account”; in my example main account no. 618170. Once this method has been setup, all customer transactions that shall be cleansed need to be changed to this method.
Step 5: Select the correct sales tax group/item sales tax group
The last step before posting the journal requires ensuring that the correct sales tax groups and item sales tax groups are selected. Otherwise no tax correction will be posted.
02 Tuesday Feb 2016
Posted Accounts Receivable
in≈ Comments Off on How to avoid small (penny) differences on customer accounts?
Tags
This post deals with the question how small (penny) differences on customer accounts can be avoided that arise when customers pay short.
Please note that the following descriptions and illustrations do only apply in Dynamics AX environments that do not make use of the automatic Accounts Receivable settlement functionality. That is, in systems that do not have the Accounts Receivable parameter “automatic settlement” activated.
Let’s have a look at the issue of small (penny) differences on customer accounts and how they can arise. The next screenshot shows you a customer transaction that was generated when a free-text invoice for a total amount of 5000 $ was posted.
Once the invoice becomes due, the customer pays 4995 $; that is, the customer pays 5$ short. The customer payment is recorded in a customer payment journal by entering the payment amount of 4995$ and marking the invoice that is paid. Please see the next two screenshots for details.
Note that you can reduce the settlement amount highlighted in the previous screenshot from 5000 $ to 4995 $. If you don’t, you will get the following message once you close the settlement form:
After posting the customer payment, the customer transaction form shows the following result:
What you can identify from the previous screenshot is that a small value balance of 5$ remains open. If you do not want to chase your customers for those small (“penny”) differences, the question arises what you can do with those small open customer balances and how they can be avoided altogether?
Cleansing small value customer balances
In order to “clean” small value customer balances you can setup a customer pool and write off the small balance amounts. The next screenshots illustrate you how this can be achieved in a standard Dynamics AX environment.
Step 1: Setup a customer pool that filters for small balance amounts
Step 2: Run the periodic Accounts Receivable “customer aging snapshot“ job
Step 3: Open the collections list page, select the small balance customer pool setup, select all records and click “write off”.
Avoiding small value customer balances altogether
To avoid small value customer balances altogether you can make use of the full settlement functionality that is available for Dynamics AX companies operating in Germany, Austria and Switzerland. To make this feature available in your country environment, simply open the CustOpenTrans form and either delete all country codes in the CountryRegionCodes field or add your country code there.
The next example illustrates the outcome of this system modification.
Example: For the same customer account used previously, a second free-text invoice for a total amount of 6000 $ is recorded. This time, the customer pays 10$ short. As previously, the customer payment is recorded in a customer payment journal as follows:
Once the settlement window is opened you can identify a new check box “full settlement”, which I selected. The result of this selection is that Dynamics AX considers the 10$ underpayment as cash discount and posts the underpayment correspondingly by referring to the automatic posting accounts setup in General Ledger.
If you double check the customer transactions form you can identify the 10$ cash discount posted. What you can also identify from this form is that no balance remains on the customer account from this transaction.
Final remark: Please note that the full settlement functionality can also be made available for vendor transactions simply by modifying the VendOpenTrans form as illustrated above for the CustOpenTrans form.
22 Friday Jan 2016
Posted Accounts Payable
in≈ Comments Off on Vendor prepayments (4)
Tags
Within the previous posts on vendor prepayments the major focus was on tax issues and how to ensure that they are posted correctly when recording vendor prepayments.
In this post I would like to focus on the disclosure of prepayments in a company’s balance sheet and the differentiation between requested and paid prepayment amounts.
That is, at the time vendor prepayment invoices are recorded in AX they do not constitute a right/receivable against the vendor who sent the prepayment invoice, as no exchange of goods/services occurred.
The right (receivable) that your company has against the vendor arises at the time when the payment to the vendor is actually made.
For that reason, some companies prefer separating “requested vendor prepayments” – that do not establish a right against your vendor – from “realized” vendor prepayments that constitute a legal claim against your vendor, as the prepayment invoice has been paid.
Problem:
The problem with the separation of requested from actually made vendor prepayments is that Dynamics AX does not provide a functionality that automatically generates a corresponding voucher at the time the prepayment is made. The following illustration that is based on the examples used in the previous posts explains the issue.
What you can identify from the illustration above is that an additional ledger transaction that debits the vendor prepayment account and credits the requested vendor prepayment account is required at the time when the payment of the prepayment invoice is made.
As the standard Dynamics AX features do not support the required Transaction, you can either implement a system modification or use one of the following workarounds.
Workaround (1):
A first option for separating requested from made prepayments is creating a manual General Ledger entry based on an inquiry of the prepayment transactions recorded. The following example demonstrates this procedure.
Example:
For the following illustrations, three purchase orders with prepayment amounts of 5000 EUR (5950 EUR), 2000 EUR (2380 EUR) and 6000 EUR (7140 EUR) are recorded in Dynamics AX. (Note: the amounts included in brackets represent the gross prepayment amounts incl. 19% VAT).
The prepayment invoices are recorded as described in the second post on vendor prepayments by using two service items (“ANZ” and “ANZVERR”) as illustrated in the next screenshot.
Please note that the service prepayment items (“ANZ” and “ANZVERR”) are setup with their item number as financial dimension value.
Also note that the ledger setup of the first service item differs from the earlier posts and does now refer to the requested prepayment account no. 132201.
The next screen-prints shows the prepayment invoice amounts posted together with the corresponding amounts that have been paid to the vendor.
Against the background of this summary and the transactions recorded in AX, 6000 EUR need to be transferred from the “requested prepayment” account No. 132201 to the ordinary prepayment account No. 132200. The amount that needs to be transferred can be identified from the sum of the ledger accounts 130850, 132201 and 200100 filtered by the “ANZ” item financial dimension. The next screenshot shows the necessary (manual) ledger transaction that needs to be posted.
Result:
After posting the manual prepayment transfer, the trial balance list page shows the following data:
In the previous screenshot, the lines highlighted in blue color represent the prepayment invoice payments made to the vendor (6000 EUR net + 1140 EUR VAT = 7140 EUR) that allow a VAT deduction of 1140 EUR. The lines highlighted in yellow color represent the prepayment invoices posted but not paid. For that reason, the VAT related to those invoices cannot be deducted yet.
Workaround (2):
If you do not like creating manual journal entries, you can setup an allocation rule as shown in the next screen-prints that does the calculation and posting job for you.
The outcome of the second workaround that uses the allocation rules for making the transfer postings is of course identical to the one realized via the first workaround. Yet, the second workaround allows you repeating the allocation transaction as often as required with almost no effort required.
This post concludes (for now :-)) the posts on vendor prepayments. I hope you enjoyed the series and look forward to seeing you in the next posts.
17 Sunday Jan 2016
Posted Accounts Payable
in≈ Comments Off on Vendor prepayments (3)
Tags
Within this post I want to introduce you another alternative approach for recording vendor prepayments in Dynamics AX. This approach differs from the ones introduced in the earlier posts by the fact that no prepayment invoice is recorded initially but that the process starts directly with the payment of the prepayment amount requested by the vendor.
Setup
In order to make this approach work, I setup the following new vendor posting profile (“PRE2”).
What you can identify from this newly setup posting profile is that the prepayment balance sheet account (“132200”) is entered in the summary account and sales tax prepayment section.
Process
Step 1: Setup purchase order
As mentioned initially, the alternative prepayment process illustrated here does not require entering a prepayment invoice and thus starts with the setup of an ordinary purchase order and the payment of the prepayment amount to the vendor.
Step 2: Pay prepayment amount to vendor
The payment of the prepayment amount to the vendor does not differ from the payments shown in the earlier posts …
…except that the newly setup posting profile is used when the prepayment journal voucher check box is activated.
The outcome of this payment transaction is the following voucher that debits the prepayment balance sheet account no. 132200 with a total amount of 5000 EUR (5950 EUR – 950 EUR).
What you can also identify from the voucher is that only the ordinary (deductible) VAT account is used, which allows deducting this amount directly.
Step 3: Post final vendor invoice
The third and final step requires that you select the prepayment made in the open transaction form of your purchase order.
Please note that Dynamics AX indicates that the payment marked for settlement is a prepayment.
Once the open transaction is marked for settlement, the final vendor invoice can be posted.
After posting the final vendor invoice, the following vouchers result:
The first voucher shown in the upper part of the screen-print records the final vendor invoice and posts a total VAT amount of 4370 EUR. This amount is offset by the related voucher created that offsets 950 EUR VAT.
As before, the following illustration summarizes all transactions posted during the prepayment process illustrated.
What you can identify from the posting summary is that no temporary (non-deductible) VAT account is recorded. Instead, all VAT transactions are recorded directly on the ordinary (deductible) VAT account no. 130800. For that reason, also this approach ensures that the VAT is posted and deducted at the right time.
Summary
A major advantages of the prepayment approach demonstrated in this post is its comparative lower complexity and its conciseness.
Those advantages do, however, come at the price of several disadvantages. The first disadvantage is that you need to generate an internal document for accounting & auditing purposes to document the prepayment made to the vendor. The second disadvantage with this approach is that you cannot directly identify the prepayments that get deducted when posting the final vendor invoice. As a result, marking all prepayment(s) made for settlement with the final vendor invoice needs to be done with utmost care.
09 Saturday Jan 2016
Posted Accounts Payable
in≈ Comments Off on Vendor prepayments (2)
Tags
After illustrating you the problems of the standard Dynamics AX purchase order prepayment functionality in a VAT company environment in the previous post, I want show you an alternative approach for recording purchase order related prepayments in Dynamics AX.
Setup
For the implementation of this approach two service items need to be setup that are used for recording the prepayments. Example:
The first service item (“ANZ”) is setup with the on account (“OA”) item sales tax group illustrated in the previous post and is used for recording the prepayment vendor invoice.
The second service item (“ANZVERR”) is setup with the ordinary (“FULL”) item sales tax group and is used in the final vendor invoice to deduct the prepayments made.
The ledger posting for those service items are posted on the same vendor prepayment balance sheet account (132200) used before but they are setup in a different section of the inventory posting form. For details, please see the next screenshot.
Process
With this alternative setup in place, the vendor prepayment process can be performed through the execution of the following four steps.
Step 1: Setup purchase order & record prepayment
The first step required in the process is setting up the the purchase order. Different from the previous posts, the prepayment is now recorded through two additional purchase order lines. The first additional line holds the first service item (“ANZ”) and is setup with the prepayment amount of 5000 EUR, while the second additional purchase order line holds the second service item (“ANZVERR”) and is setup with an equivalent but negative amount of -5000 EUR.
Step 2: Post prepayment vendor invoice
The next step in the prepayment process is posting the prepayment invoice. This time the prepayment invoice is posted by using the ordinary purchase invoice form and selecting the first additional purchase order line only. Please see the next screenshots.
Result:
The outcome of the prepayment invoice posting is a voucher that posts the non-deductible VAT on ledger account 130850. This transaction is identical to the one shown in the previous post on vendor prepayments.
Step 3: Pay prepayment vendor invoice
Also the third process step – the payment of the vendor invoice – is identical to the one illustrated in the previous post and results in the following vouchers.
As before, when recording the payment of the prepayment invoice, a transfer of the tax amount from the non-deductible VAT account (130850) to the ordinary (deductible) VAT account (130800) can be identified.
Step 4: Post final vendor invoice
The last step in the prepayment process consists of deducting the prepayment made when posting the final vendor invoice. This time, the deduction is made by including the second service item into the vendor invoice as illustrated in the next screen-print.
As a result, Dynamics AX generates the following voucher.
The next illustration summarizes all transactions posted by using this second approach.
What you can identify from the posting summary is that the non-deductible VAT account (130850) does now balance and that the VAT does now get recorded and deducted at the right time.
Summary
The alternative approach for recording vendor prepayments illustrated in this post shows that using service (“dummy”) items can help overcoming the problems of the standard prepayment functionality and results in correct ledger and tax postings.
Despite those advantages I would like to emphasize that this alternative approach comes with a higher risk of errors, as no automatic features exist that ensure e.g. that prepayments can only be deducted once the payment is made.
Please also join me in the next post that will show you another approach for recording vendor prepayments.
04 Monday Jan 2016
Posted Accounts Payable
in≈ Comments Off on Vendor prepayments (1)
Tags
Within this and the following blog posts I will deal with the question how prepayments for vendor purchases can be recorded in Dynamics AX. A special emphasis is thereby made on the tax regulations within the European Union which require that the value added tax (VAT) related the prepayment(s) can be deducted only at the time when the prepayment invoice is paid. For additional information on European tax regulations, please visit this site and/or local government websites.
Note: Within this and the subsequent posts, no difference is made between requested and actually paid (realized) prepayments from an accounting perspective. This issue will be addressed in more detail in the last post on vendor prepayments.
Setup
Let’s get started by having a look of the setup required for recording vendor prepayments in Dynamics AX. The first thing that needs to be setup for recording vendor prepayments is a procurement category. Example:
All transactions recorded for this procurement category are posted on the vendor prepayment account “132200” to incorporate vendor prepayments in the company’s balance sheet. The next screenshot shows you the section of the inventory posting form where the vendor prepayment account needs to be setup.
The next setup step requires the establishment of a prepayment vendor posting profile as exemplified in the next screenshot. Please note that this prepayment posting profile needs to be setup with a special (“temporary”) VAT ledger account – in my example account no. 130850 – that records the VAT of the prepayment invoice once it gets posted. As explained before, the VAT recorded on this account cannot be deducted until the payment of the prepayment invoice is actually made.
After setting up the prepayment vendor posting profile, you have to make sure that the Accounts Payable parameters are linked to this profile.
The last setup required concerns the VAT tax codes, tax groups and item tax groups.
Against the background of the non-deductibility of the VAT at the time when the prepayment invoice is recorded, a separate VAT tax code (“InVAT19A”) is setup that records the non-deductible VAT amount posted. I linked this VAT tax code to the ordinary Accounts Payable sales tax group(s) and the “on accounts” (OA) item sales tax group. (Please note that the on account (OA) item sales tax group is setup together with the procurement category shown before).
In addition, I connected the VAT tax code “InVAT19A” with the non-deductible tax ledger account no. “130850” via the corresponding sales tax ledger posting group.
Finally, I linked the non-deductible VAT tax code “InVAT19A” with the ordinary (deductible) VAT tax code “InVAT19” in the payment sales tax code field. This linkage ensures that we are able to deduct the VAT once the prepayment invoice is paid.
The following screenshots summarize the tax setup made.
Process
Once all necessary setups are finished, the vendor prepayment process can be performed through the execution of the following four steps.
Step 1: Setup purchase order & record prepayment
The first step required is setting up the purchase order and recording the
prepayment(s) requested by the vendor. Example:
Please note that I recorded the gross amount of the prepayment the vendor asked for [5000 EUR net + 19% VAT (950 EUR) = 5950 EUR]. Also note that the prepayment procurement category needs to be selected in the prepayment form as illustrated in the previous screenshot.
Step 2: Post prepayment vendor invoice
The next step in the prepayment process is posting the prepayment invoice though the corresponding functionality.
When posting the prepayment invoice, the prepayment procurement category and the “on account” (OA) item sales tax group automatically defaults, as illustrated in the next screen-print.
As a result, Dynamics AX generates the following ledger posting:
What you can identify from this voucher is that the tax is recorded on the non-deductible VAT account “130850”.
Step 3: Pay prepayment vendor invoice
After the prepayment invoice is recorded in Dynamics AX it can be paid via an ordinary vendor payment journal.
The only thing you have to look for in this journal is selecting the prepayment check box in the payment tab that automatically changes the posting profile.
After generating the payment and posting the journal, the following transactions result:
What you can identify from the previous screenshot is first, the payment of the prepayment amount from our bank account and second, a transfer of the tax amount from the non-deductible VAT account (130850) to the ordinary (deductible) VAT account (130800).
Note: The screenshot at the lower right-hand corner shows the related vouchers generated in addition to the payment made. As the ledger accounts used in this voucher offset each other, they can be ignored here.
Step 4: Post final vendor invoice
The last step in the prepayment process is posting the final vendor invoice for the delivery of the goods ordered. When doing this posting you have to ensure that the prepayment made is applied and deducted. The next screenshots illustrate how this application can be made.
Whether or not the prepayment(s) made are correctly applied can be identified in the invoice line section that shows the prepayments that get deducted from the total invoice amount.
After posting the vendor invoice, the following vouchers can be identified:
The first three lines posted represent the ordinary vendor invoice posted for the total amount of the goods (100 pcs. * 230 EUR/pcs. = 23000 EUR + 19% VAT = 27370 EUR). Please note that the total VAT amount (4370 EUR) is posted on the ordinary VAT account 130800.
The last three lines highlighted in yellow color represent the deduction of the prepayment made. What is interesting (wrong) here is that Dynamics AX uses the non-deductible VAT account (130850) to record the VAT already paid in step 3. In order to highlight the problem with the last voucher, I summarized all transactions created during the prepayment process in the next image.
What you can identify from this summary is that the last voucher should credit the ordinary VAT account (130800). Yet, it actually uses the same – (wrong, while non-deductible) – VAT account (130850) that was used when posting the prepayment invoice.
As a result, 5320 EUR (950 EUR + 4370 EUR) – highlighted in red color – are posted on the ordinary deductible VAT account no. 130800 that results in a wrong, while too high VAT deduction.
At the same time, the non-deductible VAT account no. 130850 still shows a credit balance of 950 EUR.
Alternative Setup Option A:
As the previously illustrated standard setup of the prepayment functionality for purchase orders provided a problematic, while wrong outcome, I changed the setup of the procurement category by assigning the ordinary (“full”) item sales tax group as illustrated in the next screen-print.
In addition to this change, I also modified the sales tax prepayment account linked to the prepayment vendor posting profile by using the ordinary (deductible) VAT account 130800.
After repeating all prepayment process steps, the following vouchers remained.
What can be identified from this summary is that the total VAT amount posted and deducted is correct. Yet, the first “ordinary” VAT transaction is already recorded with the posting of the prepayment invoice. From a tax perspective this is too early and can lead to problems with tax authorities especially in cases where prepayment invoices are posted earlier than the final purchase vendor invoice for example due to long transportation times.
Alternative Setup Option B:
As the previously illustrated alternative setup option leads to a potential tax evasion, I changed the setup of the procurement category once again and linked it with an item sales tax group (“without”) that does not record any VAT.
Result: As before, after repeating all prepayment process steps, the following vouchers remained.
The posting summary illustrated in the previous screenshot shows that the VAT is posted and deducted at the time the final vendor invoice for the purchase order is recorded. This approach can be considered as very conservative and won’t result in problems with tax authorities. Yet, from a financial cash flow perspective this approach can be problematic and easily result in cash flow problems, especially if large amounts are involved.
Summary:
All approaches for recording vendor prepayment illustrated in this post are more or less problematic (wrong). As a result, if your company operates in a VAT environment, I would recommend not using the prepayment functionality available in the purchase order form for recording prepayments. Within the next posts I will show you some alternative approaches that result in correct tax and ledger transactions. Till then.
03 Thursday Dec 2015
Posted Management Reporter
inWhen doing a financial consolidation, financial data from different companies need to be combined in a single “consolidation” report. As the data that need to be consolidated are often based on different Chart of Accounts (COA), the question arises how ledger accounts from different COA’s can be combined into a single consolidation report. This question will be answered in the following based on a simplified example.
Example:
The financial data of company DEMF and BRMF need to be consolidated. While the first company (DEMF) uses a “shared” COA, the second company (BRMF) uses a local Brazilian COA. What makes things even more complex is that company DEMF records all transactions in EUR-currency, while company BRMF keeps all its books in Brazilian reals. The next screenshot shows you the COA’s and currencies setup for the two companies.
In order keep the example as simple as possible, only the bank accounts of both companies are considered for the following illustrations.
In company DEMF only one single transaction with a total amount of 10000 EUR has been recorded on bank account (main account) “110200”.
In company BRMF two local currency transactions have been recorded on the bank account (main account) “1.1.1.2.02”.
The exchange rate used for consolidation purposes is 300 BRL / 100 EUR.
Against the background of those data, a financial consolidation report should show a total balance of 50000 EUR or 150000 BRL in the bank accounts line.
To realize this, the following setup has been done in Management Reporter.
Step 1: Setup of the row definition
The first step in setting up the consolidation report is mapping the different main accounts in the row definition of the report. This mapping in done by specifying separate row links that hold the main account information of both companies. Please see the following screenshot for an example.
Step 2: Setup of the reporting tree Definition
The next step is setting up a reporting tree. When doing this setup, you have to make sure that a reference is made between the different companies and the row definition / row links established in the first step.
Step 3: Setup of the column Definition
The third step is setting up a column definition as illustrated in the next screenshot.
Please note that you need to link the different columns with the reporting tree elements if you want to report on the different legal entities.
Step 4: Setup of the report Definition
The last step in the report generation is the combination of all previous elements (row definition, reporting tree and column definition) into a report. Please note that you need to select the reporting currency check box before running the report if you want to do a currency conversion once the report that gets generated.
Result:
Once the report is generated you can have a look at the data in the various currencies setup in Dynamics AX. The next two screenshots show you the EUR-currency and BRL-currency report.
07 Saturday Nov 2015
Posted Fixed Assets, Management Reporter
in≈ Comments Off on Fixed asset statement report issues (Appendix)
The following screenshots provide you some additional information on the fixed asset posting profile setup used for the examples illustrated in the blog posts. Please not that separate ledger accounts are used for each combination consisting of (a) the fixed asset transaction type, (b) the fixed asset group and (c) the value model.
Please note that the sales disposal parameters illustrated in the following screenshot could be setup in more detail. Yet, the major point that I want to make here is that the ledger accounts that are setup in this section differ from the ones used for recording the original fixed asset transaction. As an example, fixed asset acquisitions are recorded on ledger account 180500, while the offset transaction that is recorded when the fixed asset is sold is recorded on ledger account 180502.
As for fixed asset sales, separate sub-ledger accounts have been setup for recording the scrap of fixed assets. For details, please see the next screenshots.
The last screenshot included here shows some additional details of the ledger account setup. The term “PKW” included in square brackets represents the fixed asset group.
07 Saturday Nov 2015
Posted Fixed Assets, Management Reporter
in≈ Comments Off on Fixed asset statement report issues (part 2)
Step 6: Setup of the fixed asset statement report in Management Reporter
The following illustrations on the setup of the fixed asset statement in Management Reporter will be done by referring to sample fixed asset transactions that directly address the problems of the standard Dynamics AX fixed asset statement report mentioned previously. For that reason, the following transactions have been recorded for six fixed assets (“FA0035” to “FA0040”) in 2017.
After recording the fixed asset transactions illustrated in the previous screenshot, the following row definition is setup in Management Reporter.
@ Issue 5: „Include prepayments, long-term financial assets and alike in the fixed asset Statement Report“
What you can identify from the previous screenshot is that the fixed asset group financial dimension values, (e.g. “PKW”, “MA”, etc.), have been mapped to the different rows of the fixed asset statement report. In addition, two main accounts are included in the report and mapped to the rows in the financial asset section.
This flexible way of setting up and mapping any combination consisting of main accounts and financial dimension values allows including also those fixed assets that are not tracked in the fixed asset module but in General Ledger. As a result, the fifth issue of the standard fixed asset statement report mentioned previously can be considered to be fixed.
After setting up the row definition, the column definition of the fixed asset statement report is setup. This setup is realized by adding the different fixed asset transaction types – such as acquisitions, depreciation, etc. – to separate report columns and by filtering on the main accounts that are setup for the different transaction types. Please see the next screenshot for an example.
Note: In order to separate fixed asset reclassifications and fixed asset splits from ordinary fixed asset acquisition transactions, an additional attribute filter has been setup in the column definition of the report.
My next step consisted of merging the row and column definitions into a new report and processing this report. The next screenshot shows the outcome of this process.
Please note that the different transaction types and values posted can easily be followed up from the fixed assed statement report generated.
@ Issue 4: „No drill-down functionality”
By clicking on the data reported in the fixed asset statement report, users can execute a drill-down into the data that make up the total amounts reported. If this drill-down does not provide sufficient details, the respective Dynamics AX voucher can be opened as illustrated in the next screenshots.
As a result also the fourth issue of the standard Dynamics AX fixed asset statement report can be considered to be fixed.
@ Issue 1: „Automatic addition of newly created fixed assets”
As the fixed asset statement report is mapped to the fixed asset group financial dimensions, newly setup fixed assets are automatically added to the report. To illustrate this, an acquisition transaction for a total of 40000 EUR was recorded for a newly setup fixed asset (“FA0041”). After re-generating the fixed asset statement report, the following result could be identified:
A drill-down into the total acquisition value shows that the newly created fixed asset is automatically added to the fixed asset statement report. For that reason, also the first issue of the standard fixed asset statement report can be considered to be fixed.
@ Issue 2: „Fix column setup”
The second issue of the standard fixed asset statement report – the fix link between fixed asset transaction types and report columns – can be overcome by setting up alternative Management Reporter column definitions, which can be selected when running the fixed asset statement report. The next screenshot shows you an example how different fixed asset transaction types can be combined into a single column by filtering on the ledger accounts and vouchers setup.
Sample report result:
@ Issue 3: „Only one single row structure available”
The last remaining issue of the fixed asset statement report – the limitation to one single row structure – can be fixed simply by setting up a new (alternative) row definition that is selected once the fixed asset statement report is generated. The next screenshot provides an example of an alternative Management Reporter row definition.
Please note that also the column definition needs to be modified in line with the newly setup row structure.
If you combine both elements in a new report, basically any fixed asset statement format required can be realized.
Result:
Special topics
After investigating solutions for the problems of the standard Dynamics AX fixed asset statement report, I will now put a focus on some “special” fixed asset transactions and how they are included in the fixed asset statement report in the Management Reporter.
Special topic 1: Scrap of fixed assets
A fixed asset (“FA0037”) with a net book value of 57000 EUR is scrapped on
01. September via the following fixed asset posting journal.
Result: The scrap of the fixed asset can be identified in a separate column of the fixed asset report due to the use of separate ledger accounts for scrap transactions. For details, please have a look at the fixed asset posting profile setup in the appendix.
Note: To follow up the special transactions illustrated in this subsection, the fixed assets affected are shown at the bottom of the fixed asset statement report in separate rows.
Special topic 2: Sale of fixed assets
On 01 October a fixed asset („FA0038“) with a net book value of 57000 EUR is sold for 5000 EUR. The asset is sold via the free text invoice as illustrated in the next screenshot. Taxes are disregarded for simplicity.
Result: The sale of the fixed asset can be identified in a separate column of the fixed asset report because separate ledger accounts have been setup for fixed asset sales transactions. For details, please have a look at the fixed asset posting profile setup in the appendix.
Special topic 3: Reclassification of fixed assets:
The next special transaction is the reclassification of a fixed asset (“FA0039”) into a new fixed asset (“FA0042”) that Dynamics AX automatically creates.
Result: The next screenshot shows that the reclassification of the fixed asset is recorded in the reclassification column of the fixed asset statement report. In addition, all transactions that have been recorded for the old fixed asset “FA0039” are transferred to the new fixed asset “FA0042”.
Special topic 4: Split of fixed assets:
The last transaction illustrated here is the split of a fixed asset. In the example used, 10% of the fixed asset value of fixed asset “FA0040” are transferred to another fixed asset “FA0043”.
Result: Due to the setup of a voucher filter in the row definition, the fixed asset split transaction can be included in a separate column of the fixed asset statement report as illustrated below.
Summary
After illustrating the different issues of the standard fixed asset statement report and after introducing an approach to overcome those issues, it can be summarized that all weaknesses of the standard fixed asset statement report can be fixed by implementing some minor system adjustments and by setting up the fixed asset statement report in Management Reporter.
Please note that the automatic creation of fixed assets via purchase orders and processes related to organization wide fixed asset identifiers have not been investigated in this post. If your company uses those processes, you need to investigate whether the one or the other additional system modification might be required.
Irrespective of this qualification, I believe that the drill-down functionalities, the flexible setup options and the possibility of setting up a comprehensive fixed asset statement report that does also include prepayments, financial assets and alike, are major advantages of the approach presented here.
In addition, the possibility of setting up different row and column structures to create fixed asset statements for different reporting purposes (local GAAP reporting, tax reporting, IFRS reporting, etc.) is an advantage that can hardly be achieved with standard Dynamics AX SSRS reports.