Tags
D365FO, IFTTT, Meta, Power Automate, Power Platform, PowerPlatform, Process Automation, Process Integration, Purchase Order, Rayban, Smart Glasses


22 Sunday Sep 2024
Posted in Accounts Payable, PowerPlatform
01 Tuesday Mar 2016
Posted in Project
Using the project management and accounting module in companies that are not primarily operating in the business project area but rather in trade or manufacturing can be beneficial due to the numerous additional analysis options available in the project module. Those advantages do however come at a price especially in regards to a more complex inventory valuation. Within the following, I will illustrate you those difficulties and provide you some hints on how to overcome them.
The starting point for the next illustrations are time and material (T&M) projects that have been setup with profit and loss (P&L) and balance sheet (BS) posting project groups in order to show you the difference in the usage of the one and the other project group.
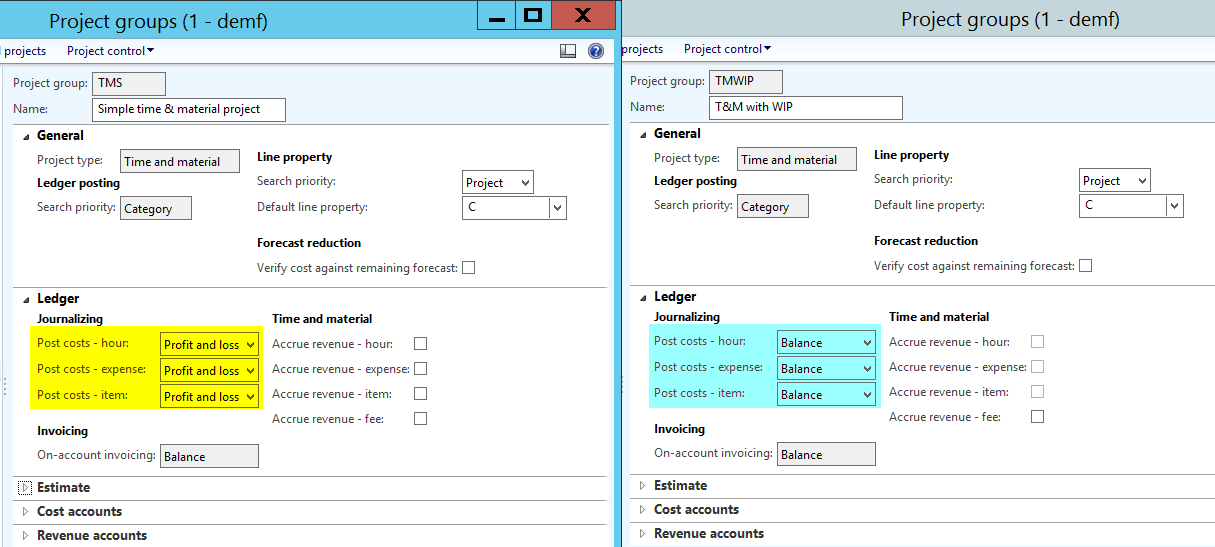
Note: For reasons of simplicity the project with the BS posting is referred to as “WIP” project while the project with the P&L posting is referred to as “ordinary” or “non-WIP” project.
From a financial accounting perspective, the following ledger accounts have been setup.
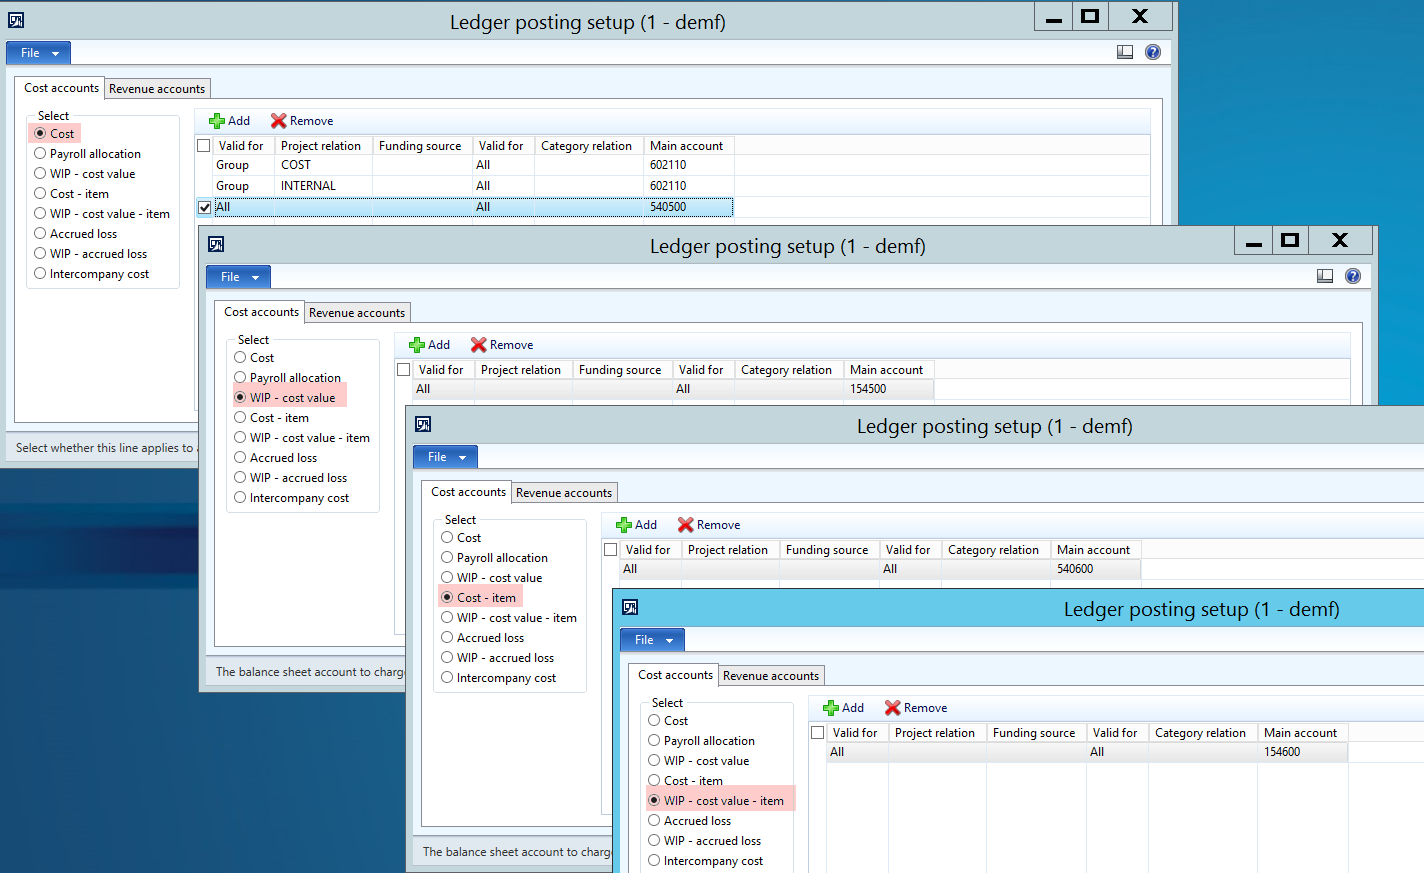
Note: All ledger accounts setup for the “WIP” posting types are Balance Sheet accounts and all ledger accounts setup for the “Cost” posting types are Profit & Loss ledger accounts.
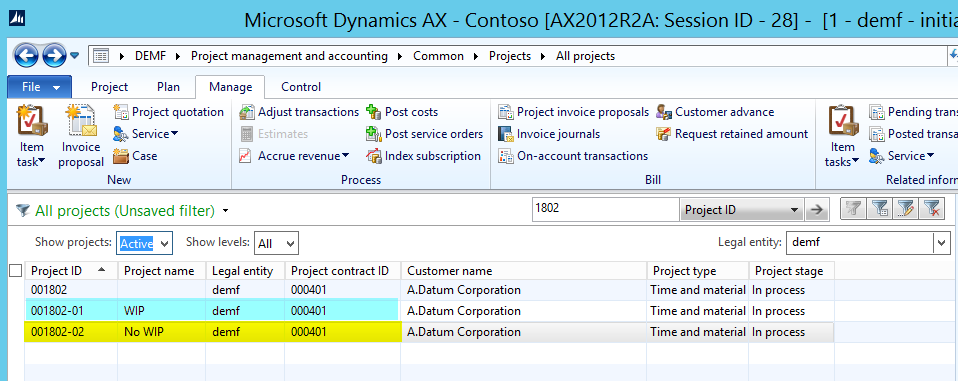
With this setup in place, I created the following two T&M projects that are used for recording an ordinary process cycle of a trading company that starts with the creation of the purchase order and ends with invoicing the customer. This process cycle will be illustrated step-by-step in the subsequent sections.
Step 1: Create Purchase Order
At the time the purchase order is created, Dynamics AX does not create any inventory / ledger transaction. Yet, depending on the setup of the project module, a so-called item requirement is created that allows you identifying and estimating the forthcoming costs.
Step 2: Post product receipt
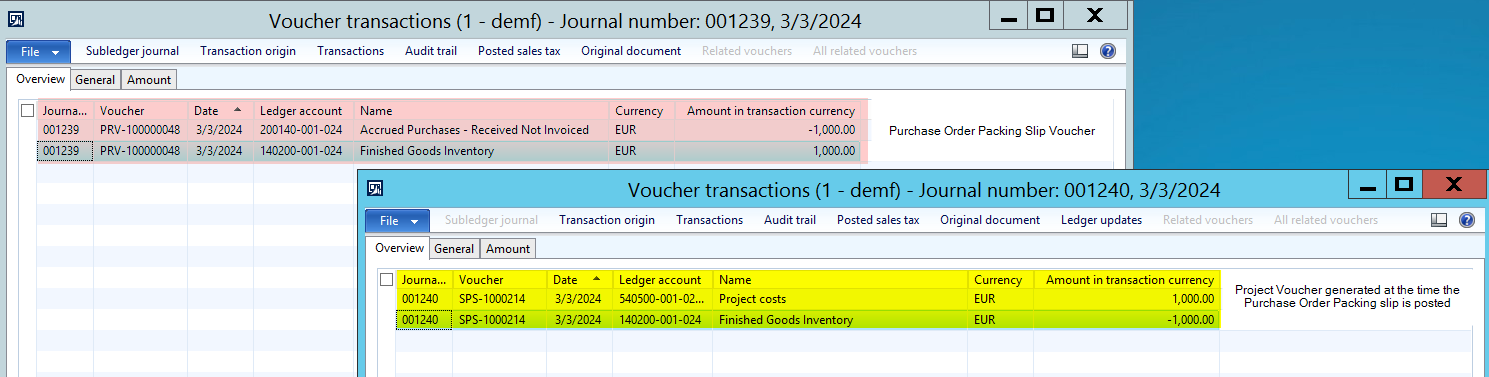
The next step in my process cycle is recording the product receipt for the items ordered (100 pcs * 10 EUR/pcs).
For the WIP project, Dynamics AX generates the following two vouchers:
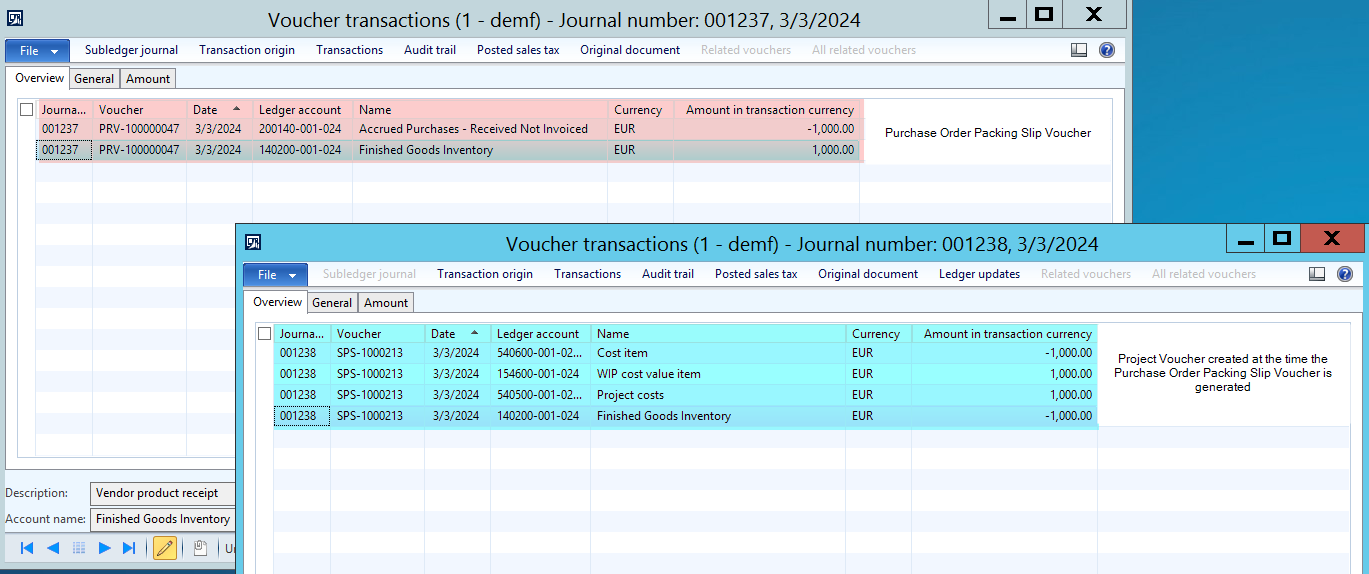
For the project with the P&L posting, the following vouchers are generated:
The next screenshot shows you the inventory value report that was run after the product receipts were posted for the WIP and ordinary T&M project:
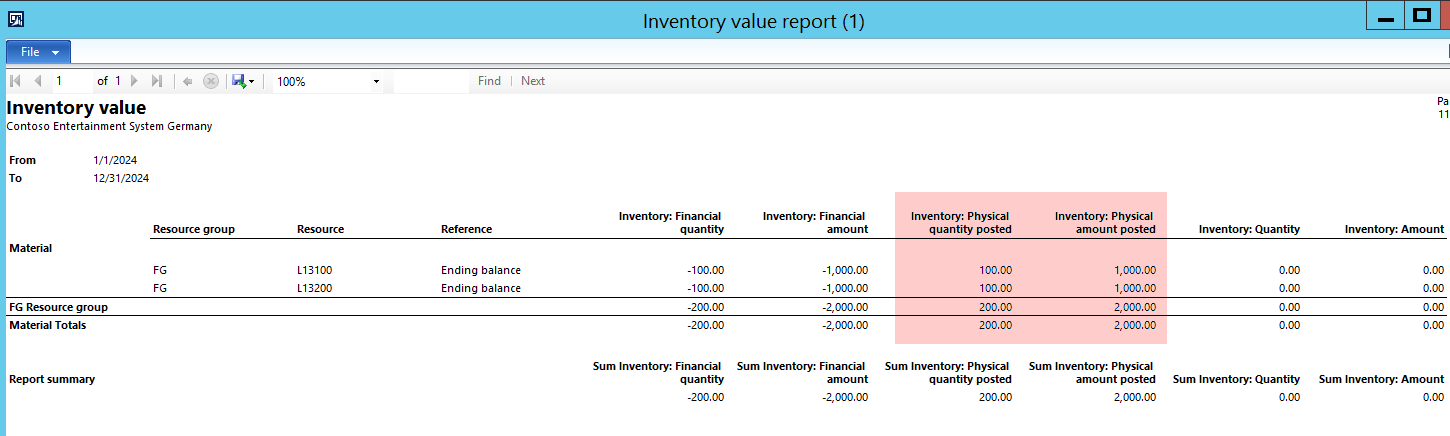
Note: The first item (“L13100”) was used for the WIP project while the second item (“L13200”) was used for the ordinary T&M project.
What you can identify from the physical inventory section of the inventory value report (highlighted in red color) is the purchase order packing slip transaction that increases inventory.
At the same time, AX created a financial inventory transaction that reduced inventory by the very same amount resulting in an overall inventory quantity and amount of 0.
In other words, even though the items have not been sold / invoiced to the customer, you cannot identify them in your inventory anymore as they are already consumed for your project.
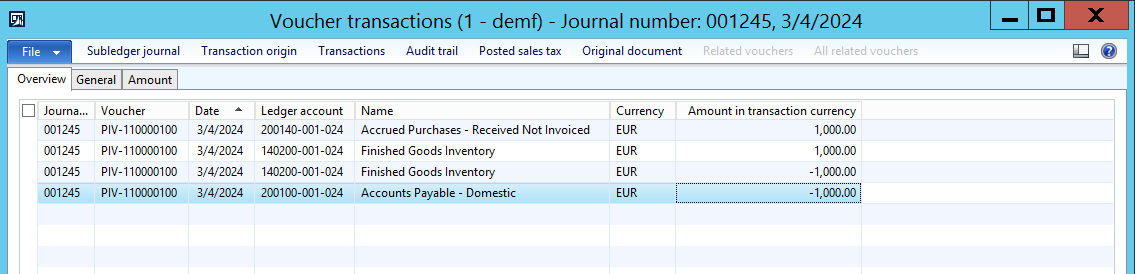
Step 3: Post purchase order invoice
The next step in my process cycle is posting the purchase order invoice. This posting generates the following voucher for the WIP and the ordinary T&M project:
After the purchase order is invoiced, the inventory value report shows the following outcome: 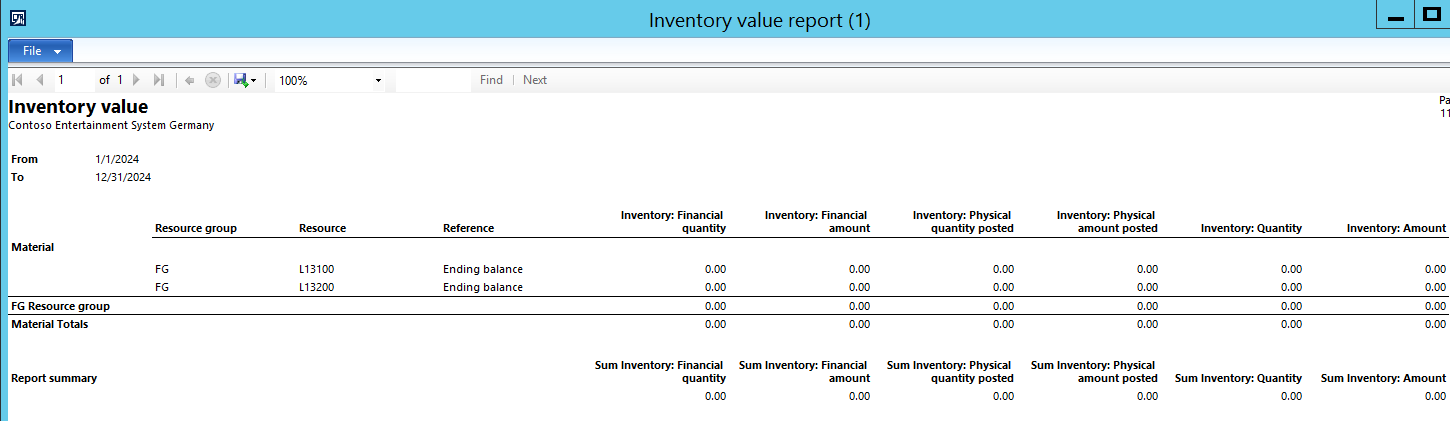
As you can identify from the screen-print above there is no inventory left despite the fact that the items have not been shipped / invoiced to the customer.
If the items have not been shipped and invoiced to your customer the question arises how you could identify and report on your inventory?
One possibility to do that is by referring to the project WIP report that is shown in the next screenshot. 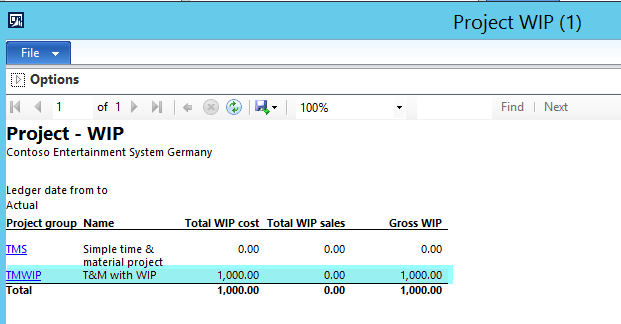
What you can identify from this report is that it works only for the WIP project but not for the ordinary project with P&L posting.
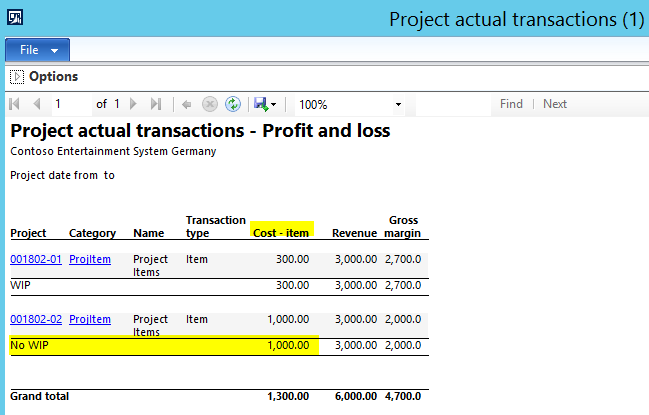
An alternative is the project actual transaction report that allows you flipping between the different project types by changing the project statement focus.

Yet, in both cases you only get financial amounts but no quantities. Let’s continue by having a look at what happens if you invoice your customer a part of the items purchased.
Step 4: Invoice customer for a bundle of 30 pcs
After the purchase order invoice has been recorded, the customer is invoiced for a part (30 pcs * 100 EUR) of the goods via an ordinary project invoice.
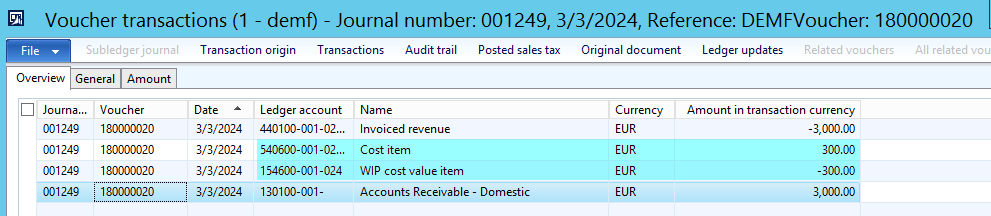
This generates the following voucher for the WIP project:
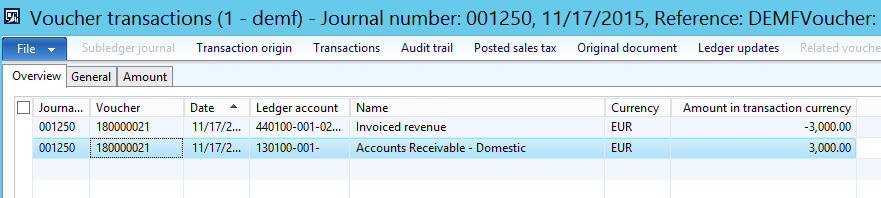
The invoice for the ordinary project results in the following voucher:
Given those invoices 70 pcs of the item with a total inventory value of 700 EUR remains. The previously used project WIP report shows this amount for the WIP project but not for the ordinary T&M project.

Unfortunately, the second alternative report used before – the project actual transaction report – is not able to show you the inventory value, neither for the WIP, nor for the ordinary project and thus leaves you with the requirement of setting up a specific project related inventory value report.
Summary:
Overall it can be summarized that the use of the Dynamics AX project module can have several advantages for companies not primarily operating in the business project area. Yet, you have to be aware that recording ordinary purchase and sales orders through this module can cause issues when it comes to inventory valuation especially in situations where products are not purchased and sold within the same accounting period. From this perspective, the use of projects with WIP (Balance Sheet postings) seem to be better suited. Notwithstanding this preference of the author, it seems very likely that your auditors will ask for a specialized inventory value report that you need to create yourself to fulfil reporting / auditing requirements. This (cost) disadvantage needs to be weighed against the potential advantages that the project module offers for trading companies.
22 Friday Jan 2016
Posted in Accounts Payable
≈ Comments Off on Vendor prepayments (4)
Tags
Within the previous posts on vendor prepayments the major focus was on tax issues and how to ensure that they are posted correctly when recording vendor prepayments.
In this post I would like to focus on the disclosure of prepayments in a company’s balance sheet and the differentiation between requested and paid prepayment amounts.
That is, at the time vendor prepayment invoices are recorded in AX they do not constitute a right/receivable against the vendor who sent the prepayment invoice, as no exchange of goods/services occurred.
The right (receivable) that your company has against the vendor arises at the time when the payment to the vendor is actually made.
For that reason, some companies prefer separating “requested vendor prepayments” – that do not establish a right against your vendor – from “realized” vendor prepayments that constitute a legal claim against your vendor, as the prepayment invoice has been paid.
Problem:
The problem with the separation of requested from actually made vendor prepayments is that Dynamics AX does not provide a functionality that automatically generates a corresponding voucher at the time the prepayment is made. The following illustration that is based on the examples used in the previous posts explains the issue.
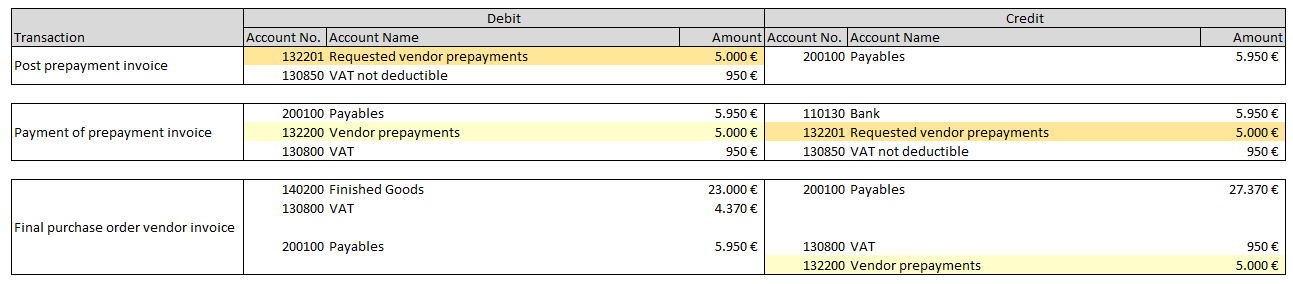
What you can identify from the illustration above is that an additional ledger transaction that debits the vendor prepayment account and credits the requested vendor prepayment account is required at the time when the payment of the prepayment invoice is made.
As the standard Dynamics AX features do not support the required Transaction, you can either implement a system modification or use one of the following workarounds.
Workaround (1):
A first option for separating requested from made prepayments is creating a manual General Ledger entry based on an inquiry of the prepayment transactions recorded. The following example demonstrates this procedure.
Example:
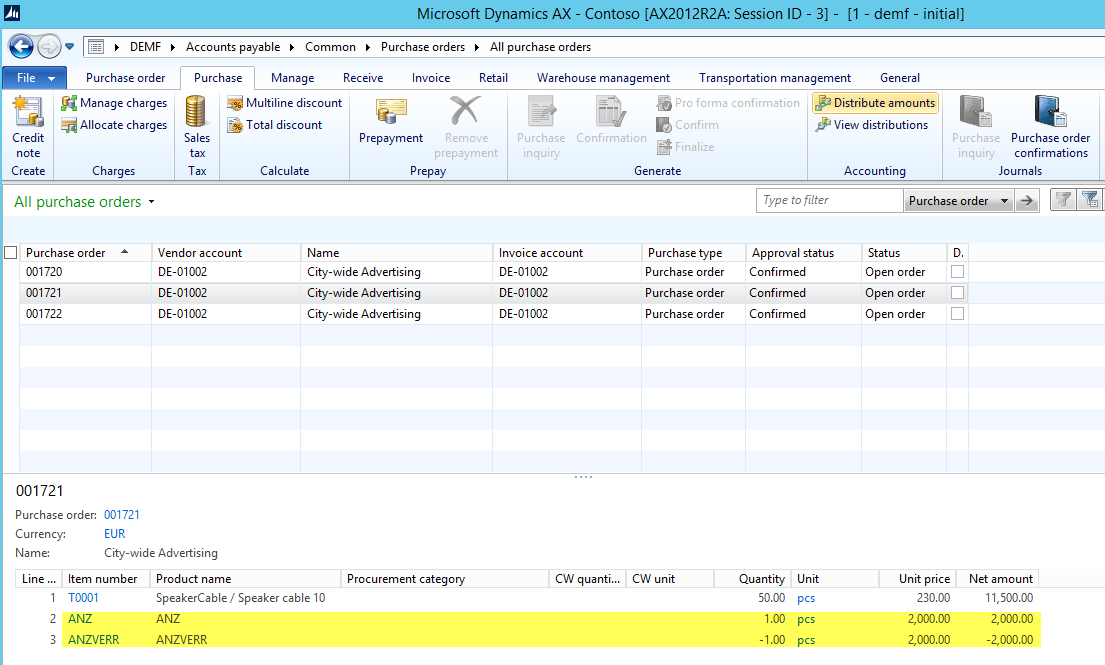
For the following illustrations, three purchase orders with prepayment amounts of 5000 EUR (5950 EUR), 2000 EUR (2380 EUR) and 6000 EUR (7140 EUR) are recorded in Dynamics AX. (Note: the amounts included in brackets represent the gross prepayment amounts incl. 19% VAT).
The prepayment invoices are recorded as described in the second post on vendor prepayments by using two service items (“ANZ” and “ANZVERR”) as illustrated in the next screenshot.
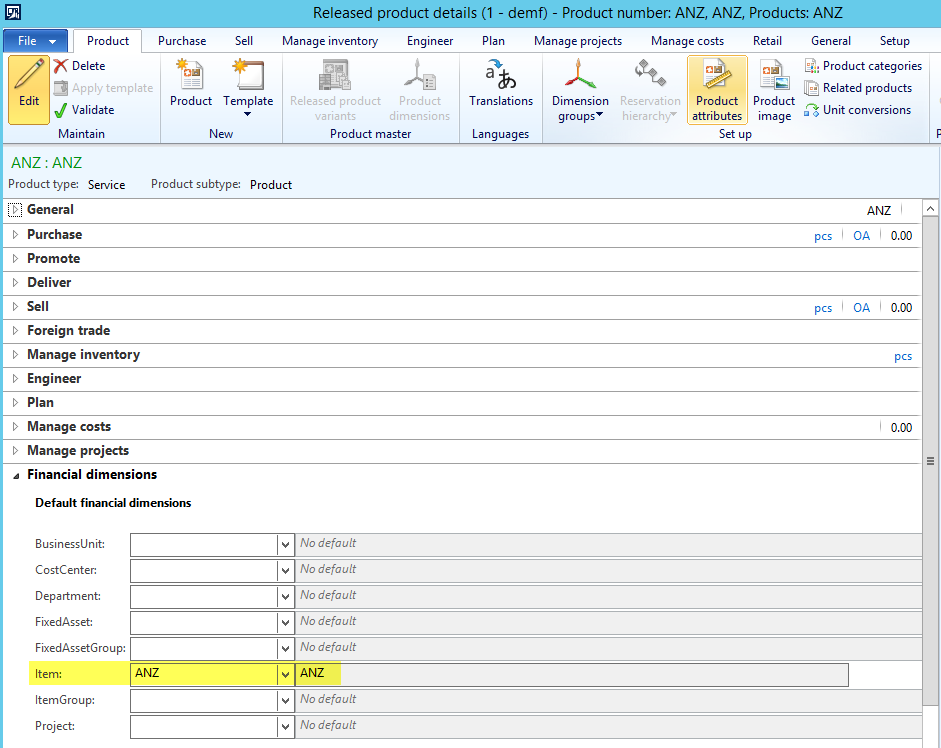
Please note that the service prepayment items (“ANZ” and “ANZVERR”) are setup with their item number as financial dimension value.
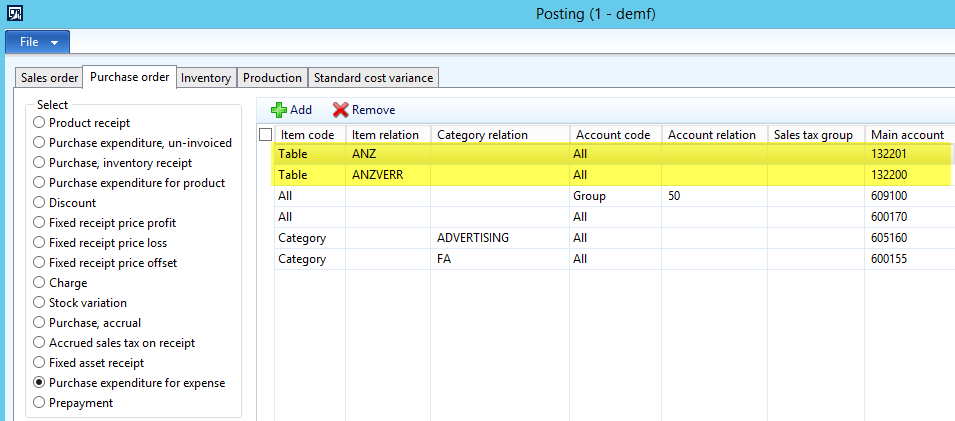
Also note that the ledger setup of the first service item differs from the earlier posts and does now refer to the requested prepayment account no. 132201.
The next screen-prints shows the prepayment invoice amounts posted together with the corresponding amounts that have been paid to the vendor.
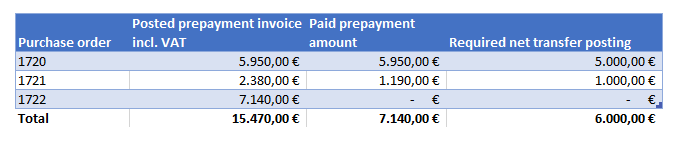
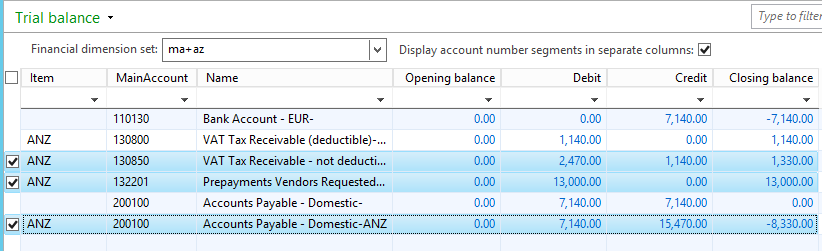
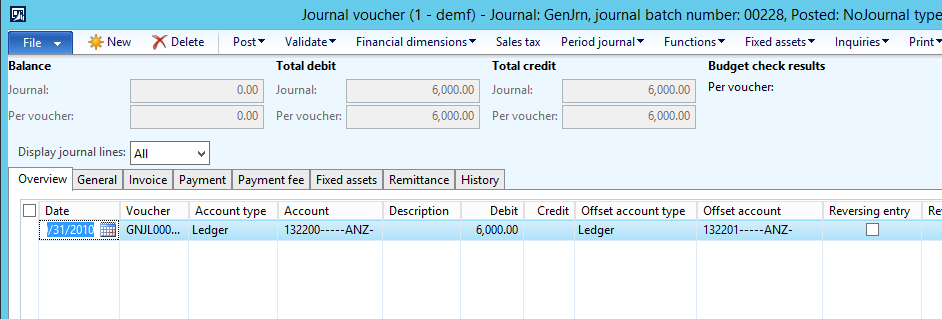
Against the background of this summary and the transactions recorded in AX, 6000 EUR need to be transferred from the “requested prepayment” account No. 132201 to the ordinary prepayment account No. 132200. The amount that needs to be transferred can be identified from the sum of the ledger accounts 130850, 132201 and 200100 filtered by the “ANZ” item financial dimension. The next screenshot shows the necessary (manual) ledger transaction that needs to be posted.
Result:
After posting the manual prepayment transfer, the trial balance list page shows the following data:
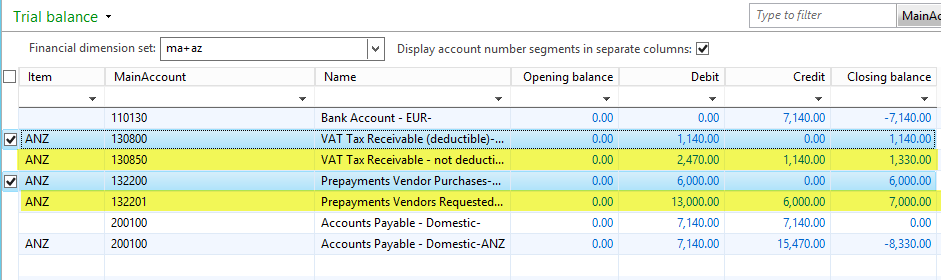
In the previous screenshot, the lines highlighted in blue color represent the prepayment invoice payments made to the vendor (6000 EUR net + 1140 EUR VAT = 7140 EUR) that allow a VAT deduction of 1140 EUR. The lines highlighted in yellow color represent the prepayment invoices posted but not paid. For that reason, the VAT related to those invoices cannot be deducted yet.
Workaround (2):
If you do not like creating manual journal entries, you can setup an allocation rule as shown in the next screen-prints that does the calculation and posting job for you.
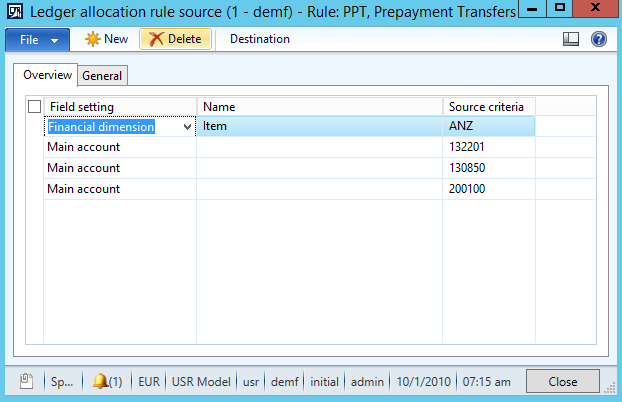
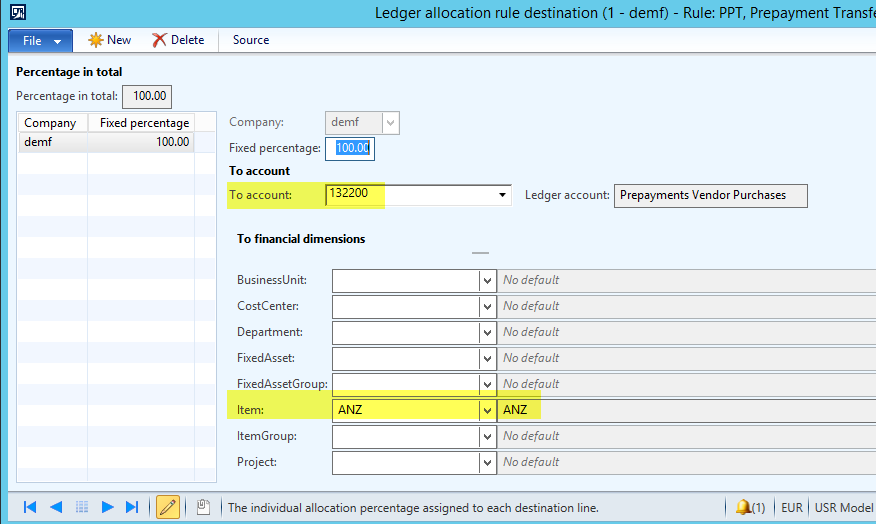
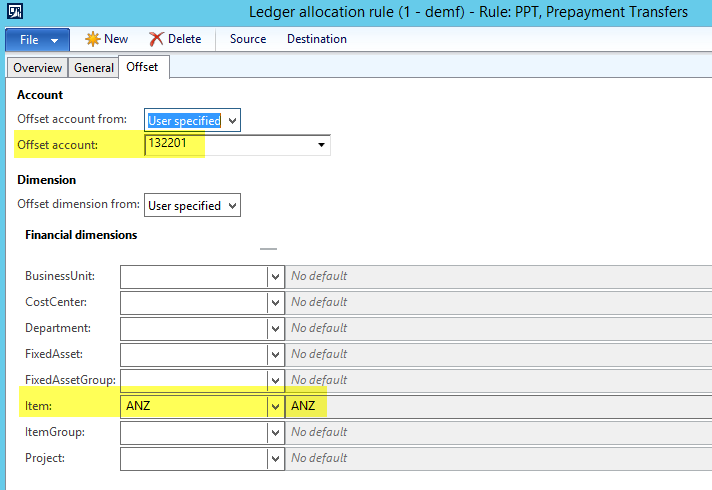
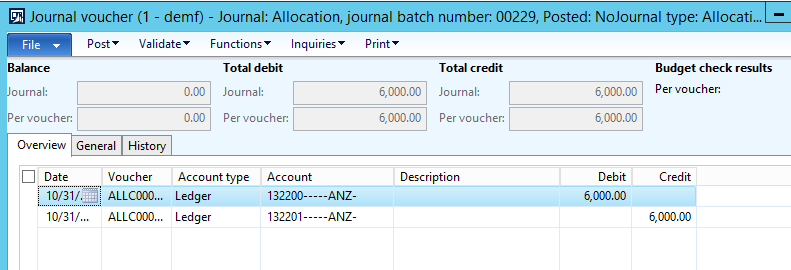
The outcome of the second workaround that uses the allocation rules for making the transfer postings is of course identical to the one realized via the first workaround. Yet, the second workaround allows you repeating the allocation transaction as often as required with almost no effort required.
This post concludes (for now :-)) the posts on vendor prepayments. I hope you enjoyed the series and look forward to seeing you in the next posts.
