Some of you might know that Dynamics AX ships with a cost accounting module that is primarily used by companies in Central Europe. If you consider using this module but find it too complex and difficult to set up, have a look at the ledger allocation functionality that can be found in the General Ledger (GL) module.
 This blog post illustrates how you can set up ledger allocation rules for distributing costs between different financial dimensions, such as departments, cost centers, business units, etc.
Scenario
The following screenshot shows you a report with different costs that have been posted on three different departments (finance, sales and operations). Because the finance department is providing services for the other two departments, all costs that have been recorded on the finance department shall be allocated to the sales and operations departments at the ratio of 20 : 80.
 To realize the allocation between the different departments, you can follow the next steps:
Step 1: Setup & activate a ledger allocation rule
The first step required is defining and activating a ledger allocation rule as illustrated in the next screenshot.

Step 2: Select allocation method, date interval and journal name
 After you setup the ledger allocation rule you have to define the method that Dynamics AX uses to allocate your cost. Currently you can select among one of the following methods:
- Basis
- Fixed Percentage
- Fixed Weight
- Distribute the source document amount equally
To me, the first two methods (basis & fixed percentage) seem to be the most important ones in practice. (Note that the basis allocation method allows making allocations based on amounts that have been posted on other ledger account – financial dimension combinations).
After having decided on the allocation method, you have to select a date interval code that defines the period Dynamics AX is calculating and posting allocations for. Note that making no selection or a wrong selection in the date interval code field often results in allocations that users are not able to follow up.
The last setup required in this window is the journal that is used for posting the allocations.
Step 3: Setup offset window
The setup in the offset window determines the offset ledger account–financial dimension combination used for posting the ledger allocation.
 Users can choose between “source” and “user defined” when making this setup. The difference between both options is that selecting “source” results in a cost distribution while selecting “user defined” results in an allocation.
Excursion:
The difference between an allocation and a cost distribution is that the former one allows you identifying the originally posted transactions while the latter doesn’t. Furthermore, selecting “source” does not require any other additional setup, while selecting “user defined” requires the specification of an offset ledger account and offset financial dimension. In the following screenshot both options are compared.
 In the previous screenshot the report on the left shows an allocation where you are still able to identify the transactions that have been recorded for the finance department. The report on the right shows a cost distribution where you cannot identify what has originally been posted for the finance department.
Step 4: Source Definition
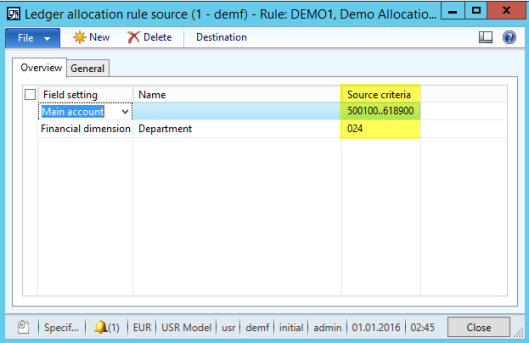
The source definition is pretty straightforward as it simply requires you defining the ledger account – financial dimension combination that will be used for the allocation / cost distribution. Please note that you can use ranges as well as wildcards for the setup in this window.

Step 5: Destination definition
After you defined what shall be allocated, you have to define where the costs shall be allocated to. Also this setup is pretty straightforward as you simply have to specify a percentage figure together with the ledger account–financial dimension combination.

Step 6: Run the ledger allocation rule
The last step is running the periodic ledger allocation process that generates the allocation transactions in the allocation journal. When starting this process you can either directly post the allocations (selection “post only”) or generate an allocation proposal that you can check and post later on (selection “proposal only”).


Result
In the example used, I selected “proposal only” which resulted in the following allocation journal voucher.
 After posting the journal, the allocations made can be identified in the lower section of the costing report.

Final remarks
Please note that the ledger allocation functionality can be used for numerous other purposes (e.g. Profit tax calculations and postings).
What is more, the GL ledger allocation functionality allows making allocations across company accounts. This is something that cannot be realized in the cost accounting module. Yet, if you consider setting up intercompany allocations remember considering tax and transfer pricing regulations.
Finally, note that using the allocation functionality in GL versus the one in the cost accounting module provides you the advantage that you can analyze the allocations made in Management Reporter and the standard Dynamics AX SSAS Cubes.
